

Post by 1ol74charger4me on Nov 8, 2015 1:48:35 GMT -5
One of the obstacles restorers face when adding or rebuilding the rear sway for a 1971-1974 (some 1975-1979 are similar design) is the odd ball rubber bushings. The only option for the square link bushing is NOS for non split examples (bushing is same for front sway bar of 1965-1973 C bodies ), NOS split examples (same as front of 1973-1974 Charger front sway bar) or urethane split examples for front sway bars on 1973-1974 Chargers. The bushing for the Charger is for a 15/16 bar(or 13/16) but most used bars have wear in the bushing areas which unless built up, will need a custom fit to produce a nice tight grip when the bushing collapses . Split example bushings also allow you some flexibility for fit by spreading the split open to grind or sand away material to close up the gap, giving a tighter custom fit. My best results for installing have been to press the bushing into the link with a press and using large amounts of spray silicone , slide it around the bar to the proper placement.
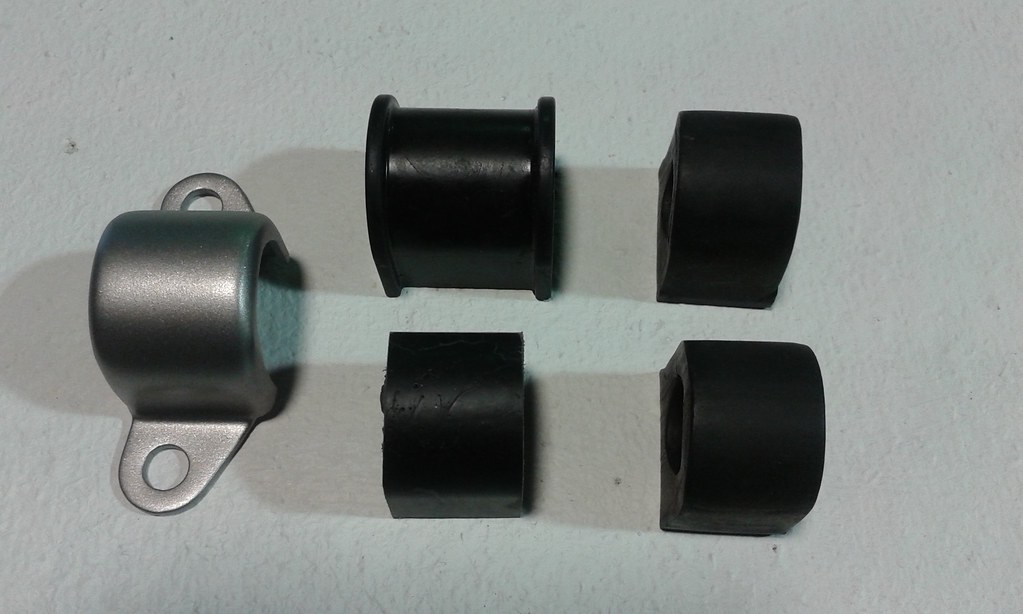
The bushings that I want to focus on here are the ones that bolt to the frame in the u shaped brackets. These may be available NOS but I have never seen them personally and Energy Suspension does not seem to have a "drop in " solution. What I did was to modify Energy Suspension part number 9.5108G which is a 7/8 stabilizer bushing package in black, to fit. There is another part number that is similar but it has the hole for the bar higher up. There is also a greasable bushing set for those that want to go a little further with this mod. This first picture shows the new unmodified bushing, modified new bushing along with the old bushings and restored bracket.
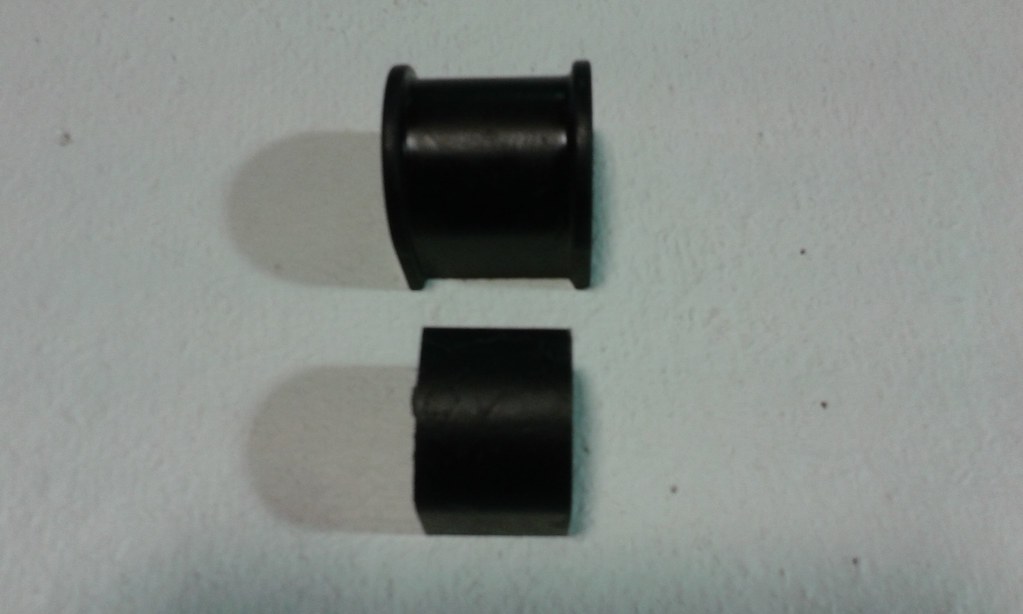
The drawback to the new bushing is that it is too wide. The height, size and placement of the hole for the bar are dead on but it has to be narrowed. The convenient part is that by removing the amount of the shoulders on each side, it will come real close to fitting and with a little more material off, gives a nice tight custom fit. The next picture shows the difference.
The method I used to make the bushing fit is not the safest, so I would caution to either use with extreme caution or find a way you are comfortable with. Please use safety glasses, a respirator or dust mask and vacuum up the residue , not blow it off and pollute your shop. My method was to mount my belt sander in a vise and use it as a surface grinder to grind away the excess.

The belt sander did it fairly quickly and the added benefit to me was that it took away the slick urethane rubber look and made it look like a factory rubber bushing. I used a 40 grit belt but you could use progressive smoother belts for a smoother finish if desired. I first ground down past the shoulder areas and then cautiously checked and rechecked till I got a nice custom snap in fit. The bottom of the bushing even extends past the bottom of the bracket the same amount as factory so it will have the same amount of squash to hug the bar as factory. For me, this was the best answer to the bushing problem and after installing these with a little food grade grease, should give a better that factory handling to my Charger
I thought I would end this with a couple of tips worth sharing. The belt sander trick is also useful for surfacing thermostat housings, shaping metal brackets, surfacing body dollies and hammers along with whatever you can find a small surface grinder useful for. I bought a cheap $40 Black and Decker 3"x 18" belt sander with the idea of it being cheap and disposable but it just keeps going and going. Do buy one with adjustable belt tracking though. Treat it with the same respect as any other tool, which is like it wants to kill you and can. Remember to lube all urethane bushings with a food grade grease and not petroleum based because it will make them shrink and collapse in time. Energy Suspension includes a small amount but a better choice is to buy a gun tube of it from Ebay (usually hard to find locally) and you will have plenty to do quite a few projects.
The bushings that I want to focus on here are the ones that bolt to the frame in the u shaped brackets. These may be available NOS but I have never seen them personally and Energy Suspension does not seem to have a "drop in " solution. What I did was to modify Energy Suspension part number 9.5108G which is a 7/8 stabilizer bushing package in black, to fit. There is another part number that is similar but it has the hole for the bar higher up. There is also a greasable bushing set for those that want to go a little further with this mod. This first picture shows the new unmodified bushing, modified new bushing along with the old bushings and restored bracket.
The drawback to the new bushing is that it is too wide. The height, size and placement of the hole for the bar are dead on but it has to be narrowed. The convenient part is that by removing the amount of the shoulders on each side, it will come real close to fitting and with a little more material off, gives a nice tight custom fit. The next picture shows the difference.
The method I used to make the bushing fit is not the safest, so I would caution to either use with extreme caution or find a way you are comfortable with. Please use safety glasses, a respirator or dust mask and vacuum up the residue , not blow it off and pollute your shop. My method was to mount my belt sander in a vise and use it as a surface grinder to grind away the excess.
The belt sander did it fairly quickly and the added benefit to me was that it took away the slick urethane rubber look and made it look like a factory rubber bushing. I used a 40 grit belt but you could use progressive smoother belts for a smoother finish if desired. I first ground down past the shoulder areas and then cautiously checked and rechecked till I got a nice custom snap in fit. The bottom of the bushing even extends past the bottom of the bracket the same amount as factory so it will have the same amount of squash to hug the bar as factory. For me, this was the best answer to the bushing problem and after installing these with a little food grade grease, should give a better that factory handling to my Charger
I thought I would end this with a couple of tips worth sharing. The belt sander trick is also useful for surfacing thermostat housings, shaping metal brackets, surfacing body dollies and hammers along with whatever you can find a small surface grinder useful for. I bought a cheap $40 Black and Decker 3"x 18" belt sander with the idea of it being cheap and disposable but it just keeps going and going. Do buy one with adjustable belt tracking though. Treat it with the same respect as any other tool, which is like it wants to kill you and can. Remember to lube all urethane bushings with a food grade grease and not petroleum based because it will make them shrink and collapse in time. Energy Suspension includes a small amount but a better choice is to buy a gun tube of it from Ebay (usually hard to find locally) and you will have plenty to do quite a few projects.


 " alt=" "]