DynoDave
CO-ADMINISTRATOR
Motown Mopar-Wizard
Posts: 11,163
|
Post by DynoDave on Jul 20, 2019 10:49:28 GMT -5
It can hardly be said that there is an "advantage" to dragging a project out over decades as I have. Indeed, there is none. But it has been interesting to see the evolution of parts available, and what is considered "acceptable" home quality work (per magazines, TV, etc).
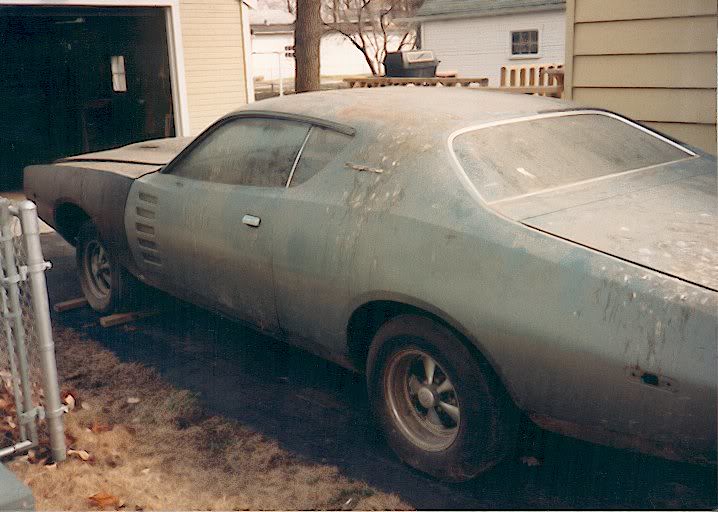
When I started on my Charger c1988, virtually nothing was reproduced. It was always going to be a case of trying to find 20+ year old parts that were better than what you had (fat chance), or fixing what you had in some manner.
With the hood hinge area of the inner fender, one of my predecessors had made some kick-, highly robust steel plates to bolt over that area. Installed with allen head bolts (as was much of his pro-street themed work), they were a huge improvement in strength and appearance. C1982, they looked pretty slick.
10 years later, the patches were passe' (and gone from the market), and import replacement body parts quality whole inner panels were the rage. We got them not because of 3rd gen Charger demand, but because they are shared with e-bodies, which were getting hot by then. HUGE jump in labor to install though. And far more money to buy than patches.
10 years later, those semi-accurate inners are gone, and more precise, higher quality inner are...well...in! Sort of makes the effort and expense more worthwhile when you get a really good quality part to work with. But of course they are more money once again.
Ever the contrarian, I never felt that cutting off an entire good panel to fix rust a small patch could fix was the right answer. But that's what is done today. People change whole quarter panels like they change underwear. I was fine with small patches for just the rusty area, or lower halves that were (gasp) flanged. Dare show a 1/2 quarter with a visible flange inside the trunk at a car show, and no one takes you seriously. Seems silly to me.
So I'm stuck. My inners are in about average condition for what they are, but that means rust along the bolt flange at the top where the fender bolts on, rust in the area the battery tray attaches, rust around the arches for the upper control arm, and rust behind the hood hinges. I've patched the flanges, POR15'd the battery tray area, and patched the hinge areas. I never came up with a satisfactory "easy" fix for the arches, so I was planning to cut them out and fab new ones. But, maybe 10 years ago, at our WPC GLR Winter Swap meet, I bought a never-used pair of the cheap early version of the whole inners. The guy was just about giving them away. But now with better ones available, and the effort being the same, do I move on to a 3rd solution?
Only time will tell.
|
|
|
|
Post by 71se3834v on Jul 21, 2019 21:25:09 GMT -5
One thing I failed to mention in the beginning is I put the car on jack stands to get it higher off the ground. I tend to do this if working under the dash etc as it makes life a little easier. I find myself taking extra time to set myself up to work more comfortably the last number of years. Ok, tear out is complete. I scraped the old, loose glue off. Where the headliner was attached I spent a little more time using a wire wheel to clean glue off. Don't go crazy it's not necessary to get it real clean. Where the insulation was on the roof I just scraped it with a putty knife to get the loose off. I took the time to grind down "sharpies" left over from the welding process here and there. Probably not necessary but I'm weird like that. I laid a plywood board from the door sill to the tunnel with 2) 4x4 blocks under the tunnel side to make something to lay on. With some carpet and a folded moving blanket on top I was able to reach the roof areas without much effort. This came in handy when putting the roof insulation up. On to that. I had used CRC adhesive as seen below to attach the insulation to the new package tray and trunk divider. It worked well but I noted it came out thinner like spray paint. www.flickr.com/photos/182536383@N06/48319313342/in/dateposted-public/I figured I needed something a little heavier to hold the insulation to the roof. I found this at my local O'Reilly's. www.flickr.com/photos/182536383@N06/48319195466/in/dateposted-public/It is much heavier, looked more like what the factory used and sprayed out in a sort of circular pattern and covered well. In the time it took me to climb into the car it had set up and once in place it stuck. The insulation I got from Classic Ind. and for the $20 it cost it is great! More like a jute material and dense not like the loose material the factory used which is more like household insulation. I'm hoping for a real barrier from sound and heat from the sun. You can also see the insulation I put on the C pillars. More on that later. www.flickr.com/photos/182536383@N06/48227451282/in/dateposted-public/www.flickr.com/photos/182536383@N06/48227450877/in/dateposted-public/I took a ton of measurements of where everything attached to the roof and drew out a map. In the end you can feel for where everything attaches to the roof but I like to be redundant and confident before I'm poking holes in new material. One thing to be sure to measure is the dome light. You can feel for the slotted holes where the screws go but the base is offset so you need to know to which side the hole for the socket needs to be cut (towards the front). www.flickr.com/photos/182536383@N06/48227436777/in/dateposted-public/At this point the next segment will be starting the reassembly. I've got a few days before I can work on the car so hopefully I can get a little more caught up on the pics and process. |
|
|
|
Post by brigond on Jul 21, 2019 22:52:06 GMT -5
Very coo! I can't wait to see the final product. Wish I had seen the dome light picture you posted, a few months earlier. I messed up the headliner opening a little bit on mine. Gonna archive some of your pictures for future references.
|
|
|
|
Post by 71se3834v on Jul 22, 2019 6:42:35 GMT -5
It is looking awesome! I'm really liking the black color. The headliner & trim are done and I'm working on insulating the floor.
|
|
DynoDave
CO-ADMINISTRATOR
Motown Mopar-Wizard
Posts: 11,163
|
Post by DynoDave on Jul 22, 2019 8:06:16 GMT -5
That Permatex is what I have used in the past...works very well.
Great pics and details. Thanks for posting. I'm certain I will be needing these when I go to put my jigsaw puzzle back together.
|
|
|
|
Post by 71se3834v on Jul 22, 2019 21:26:57 GMT -5
Headliner goes in: Keep track of were your bows were placed. The '71 has 6 then they went to 4 either sometime in '71 or '72. Some are a different length. The factory did color the ends but I marked them from front to back 1-6. #6 has 2 hooks connected to the rear to hold them straight up when you pull the headliner forward. The headliner is wider than needed so you have to cut holes in the sleeves for the ends to poke out. When looking at the old headliner they had some sleeves cut back further than others. I had thought it was so you had room to pull things tight but when I went to line the sides up with where the shoulder belt clips were I saw that the sleeves needed to be cut back further on some so the angle of the curve down to the edge matched how far out the mountings were. Hope that's understandable. I guess if I had thought ahead that this was going to be an instructive thread I woulda took more pics but I get rolling on the work and get tunnel vision and forget about that. Now about the headliner: I bought mine from Classic Ind. along with the insulation, glue and some other things for future projects. Paid $85 less a sale percentage that I can't remember (my receipt just has the total discount on all items). After installing the bows in the roof and doing an initial pulling of the headliner I discovered by looking up the sides between the roof that the bows were leaning forward. My first thought was the hooks in back had come loose. Pulling down the liner off the teeth I did find one hook had come off. I re-hooked it but that didn't solve anything. I then measure between the seams of the old and the new. The new headliner was longer between every seam. Obviously when starting from back the further forward I went the bows leaned further forward. I then had a choice to make. Take measurements of my old liner and call around to see if any other companies would measure theirs to compare. I figured 'How many companies that make headliners are out there? Everyone probably sells the same brand.' And 'How much time will that waste?' Now I'm not one to let things go when I buy a shoddy product but this project had already dragged on and after doing that first stretching I thought things would turn out ok.....and it did. I did leave them a bad review though but I haven't called them...yet. I think that's more than enough for now but I will throw in a few pics of the initial stretching. Note my caulk marks where the dome light goes. I slapped the sail panels up to make more caulk mark so I didn't make relief cuts too far. www.flickr.com/photos/182536383@N06/48227386086/in/dateposted-public/www.flickr.com/photos/182536383@N06/48227480812/in/dateposted-public/www.flickr.com/photos/182536383@N06/48227385846/in/dateposted-public/ |
|
|
|
Post by 71se3834v on Jul 23, 2019 21:05:02 GMT -5
Ok, I left the initial stretching along for a few days. When I got back to it I was able to pull it some more. I used a combination of basic black binder clips and these clips that are pictured to hold the sides. www.flickr.com/photos/182536383@N06/48303362181/in/dateposted-friend/I had to go in at certain seams and cut back the bow sleeve in order to get the right angle of the headliner down to the edge of the doorway. As I mentioned the rear shoulder belt clip stuck way out then on the other side of that bow where the coat hanger mounts was set back deep. It takes a bit of tedious work to get it right. Don't worry about getting it perfect as you have to keep in mind how much those hangers push back and tighten up the vinyl. Also the trim piece has four clips on it that will hold it and also push back the vinyl. In the end I spent too much time getting areas tight only to loosen them up later. Some of those areas were glued. One thing worth pointing out is the 2 hooks in the back that hold the rear bow up. When hooking them in the vinyl angle them towards the inside of the car so when you pull that area they give you some movement and straighten out to a 90* angle. The insulation I used for the C pillar (and the floor) came recommended by Ozking. It is a foam backed foil with adhesive on it, R factor 3 made by Frost King. Available at Lowe's. Funny thing, if I shine a light directly on that area the silver shows through and it looks like stars. www.flickr.com/photos/182536383@N06/48361133562/in/dateposted-friend/I had made some relief cuts and trimmed off the excess during that 2nd stretching. When I was satisfied with it I glued down where the excess hung down below the teeth at the front and rear windows, the C pillars, the area where the seams wrapped around the side window areas and the excess at the A & C pillars. Basically all the areas where I saw the factory did. Keep in mind that too much glue will bleed through the holes and at the front windshield the factory glued too far out causing that yellowing shown earlier. You only need to glue the strip that the trim will cover. Also gluing beyond the teeth was extra that the factory did not do. After a couple of days of drying I threw the front trim and mirror up. Almost forgot to mention that I went around and sliced open the slots where the trim screws went so they were easier to find and wouldn't "catch" when running the screws in. www.flickr.com/photos/182536383@N06/48361279357/in/dateposted-friend/Looked pretty good but I ended up peeling the A pillars off and repositioning the vinyl to get that wrinkle out and the wrinkle that showed up on the other side when I simulated the visors being mounted. After installing the new package tray and trunk divider in went the sail panels and rear window trim. That trim was a pain in the but to get lined up to all the screw holes. 1) don't tighten up any screw until they're all in and 2) you can't just start with one then move to the next. I had to jump around alternating hole until they were all in. Here's a pic. www.flickr.com/photos/182536383@N06/48361327272/in/dateposted-friend/See that white spot towards the drivers side? Oops! Anyone know how to get dried contact cement off vinyl? When it was fresh I wiped off most then tried Denatured Alcohol (after testing on a scrap piece) and Goof Off. No luck but it only shows up with direct light on it. See that wrinkle? I'll tell you how I got that one out next time. |
|
DynoDave
CO-ADMINISTRATOR
Motown Mopar-Wizard
Posts: 11,163
|
Post by DynoDave on Jul 24, 2019 8:31:48 GMT -5
Looking good!
If Goof Off won't remove it, I'd be hesitant to tr anything stronger. Good thing you have scrap to test on.
If it dried hard enough over time, perhaps you will be able to carefully flake it off with a small dental pick?
|
|
|
|
Post by jeremy on Jul 25, 2019 20:16:21 GMT -5
After installing the new package tray and trunk divider in went the sail panels and rear window trim. That trim was a pain in the but to get lined up to all the screw holes. I have to admit I may have gotten a little angry while putting that trim in  |
|
|
|
Post by 71se3834v on Jul 26, 2019 8:25:31 GMT -5
Yeah for sure. Fortunately I have enough experience with this stuff and I know from past experience to 1) Aways install all screws or bolts before tighten them down and 2) If you can't install the screws in the first way you try start with installing others first. Sometimes you can't go from one to the next you have to criss cross or alternate from one to another.
|
|