|
|
Post by 71se3834v on Apr 18, 2020 19:24:01 GMT -5
Yeah I've read about the plates breaking down and building up on the bottom "shorting" out the battery internally by making contact with multiple cells.
|
|
DynoDave
CO-ADMINISTRATOR
Motown Mopar-Wizard
Posts: 11,157
|
Post by DynoDave on Apr 18, 2020 22:45:26 GMT -5
Like most things I jump into for the first time, this is a longer, messier job than I thought it would be.  Only one way to the bottom, err, top. Keep on digging! Gasket scraper to separate several plates about 3/4 - 1" down, one of granspa's old ball-peen hammers to tap it in, regular pliers to rip out a little section, needle nose piers for the more stubborn wires at the edges of the plates. Do it again, and again, and..... Got a couple of hours in on it today. Added clamps to help support all four corners, hoping to avoid further damage. Trimmed off a little more of the bottom, so I could more easily remove plates all the way to the edges and ends. I'm about 2 cells short of finishing my second pass. I'm gonna say I'm 1/3 to 1/2 half way to the top when I finish this row. Doesn't seem like that's going to be this weekend though.  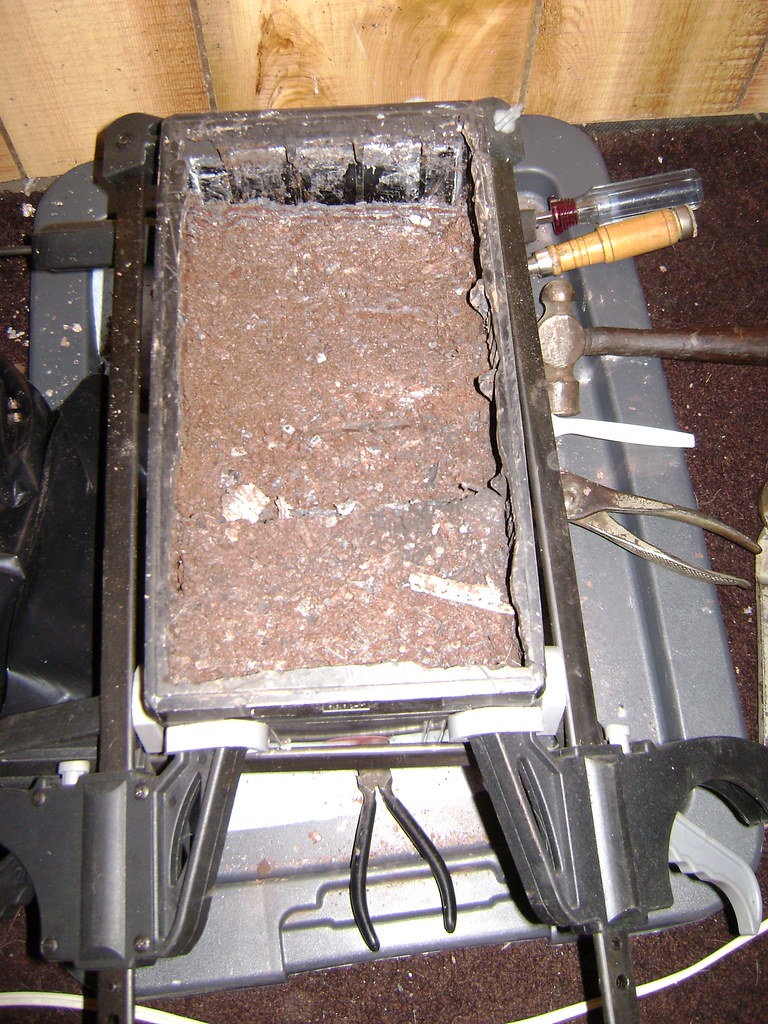 |
|
|
|
Post by hanks73340 on Apr 19, 2020 8:47:00 GMT -5
I'm getting sore just watching you work on this......  |
|
|
|
Post by 71se3834v on Apr 19, 2020 9:50:53 GMT -5
|
|
DynoDave
CO-ADMINISTRATOR
Motown Mopar-Wizard
Posts: 11,157
|
Post by DynoDave on Apr 19, 2020 12:43:01 GMT -5
It's coming out in chunks the size of what you can grip with pliers....like 1/2" squares. Then you have to go back and fight the stray framing wires, break out dividing walls, and scoop out debris. My hands are getting pretty tired. I did do the smart thing (finally) and moved this off the floor, and up onto my Black & Decker Workmate. So at least my back is not hurting, and legs cramping as much from sitting hunched over. Listening to KSHE's Klassics (a four hour program of classic rock with KSHE D.J. of over 40 years, John Ulett) made the time go by quicker this morning. The odds of this little project succeeding got a little bit longer today, when this sizeable hole appeared in the side of the case. Not good. The case is old and brittle, and does not like me hammering and tugging at it. I haven't even looked at the top, to see how that crack around the negative post is looking. I'm trying to be careful, but there's only so much I can do.  Jeff, Plan B it to scrap the case and save just the top. But this top needs to be functional, with the cables attached. I'm not sure if the repro toppers have real terminals that pass all the way through or not. But something like that is plan C. Buying another repro battery is the last stop for this train wreck. Hey, nothing ventured, nothing gained. The good thing for me is that all of the sides, and 50% of the top are hidden by the Thermoguard. So I can get away with a lot. |
|
DynoDave
CO-ADMINISTRATOR
Motown Mopar-Wizard
Posts: 11,157
|
Post by DynoDave on Apr 19, 2020 21:16:21 GMT -5
At last...a breakthrough. While breaking off little 1/2" squares of lead plate, I finally got a large piece of a plate!  Seems that while much of the battery is badly decayed, including all of the battery at the bottom (top as viewed), the further I dig down toward the top of the case, the better the condition of the plates, and some are hanging together well enough to come out in larger pieces. After a few more rows pulled out in the a similar fashion, I broke through into the fluid space at the top!  The rest of that cell, and the couple next to it came apart in a more typical (difficult) fashion. Then this cell started pulling apart in huge pieces, until I could see the first daylight trough of the cap holes on the top cover! I feel like I just escaped from Shawshank!  Here's where I left off for the night. Did a little shop cleanup, and called it a day.   |
|
DynoDave
CO-ADMINISTRATOR
Motown Mopar-Wizard
Posts: 11,157
|
Post by DynoDave on Apr 20, 2020 20:42:19 GMT -5
Going, going...  ...gone!   What's left are the huge lugs that all the plates tie into, then connect to the next cell. Don't ask me how I'm getting those out, because I have NO IDEA. |
|
DynoDave
CO-ADMINISTRATOR
Motown Mopar-Wizard
Posts: 11,157
|
Post by DynoDave on Apr 22, 2020 20:17:13 GMT -5
Took yesterday off, but got back at it today for an hour +. So I'm left with these spots...lead tie plate, with the remaining ends of the lead battery plates attached. You can see in the cells marked 1 and 3, the ends of the lead battery plates have all but fallen apart, with little remaining to be removed. 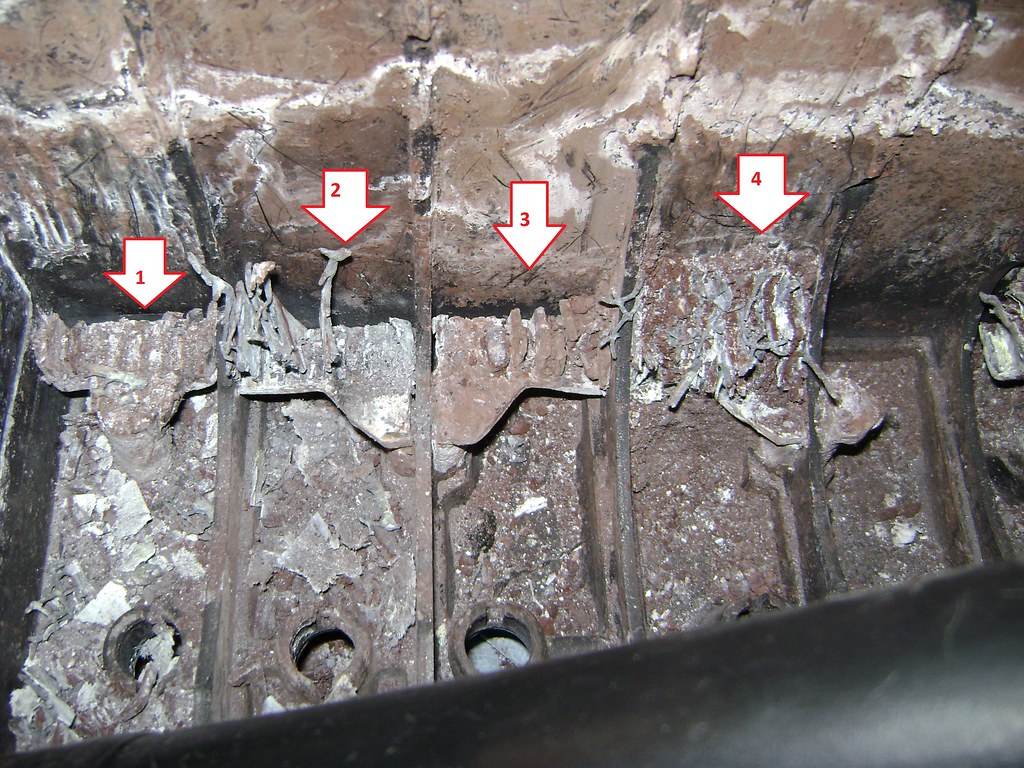 In cell 2, I have taken a Dremel, and cut about 2/3 of the way through them horizontally (that's as far as the cut-off wheel would reach), and using pliers I have started to twist them off, working right to left. Cell 4 is what most started out looking like. To get a "clean" stack of plates to cut as in cell 2, I had to use a small screwdriver to scrape the debis from behind one plate, fold it over, clean the next gap, go to the next, all the way across. Here's the "finished" product. The lugs in the upper left and upper right corners are the underside of the posts on the top of the battery. Here I have trimmed them down to be round posts on the inside, more or less. And I think this is about as far as I'm going to go. Working to cut away more of the remaining tie plates is difficult, and stressing the plastic case pretty severally. The corner posts are not going to live, as there's nothing tied to them on the underside. And the small battery I'm going to place in here will come no where near the remaining lead pieces. Tomorrow I'll give it a bath. 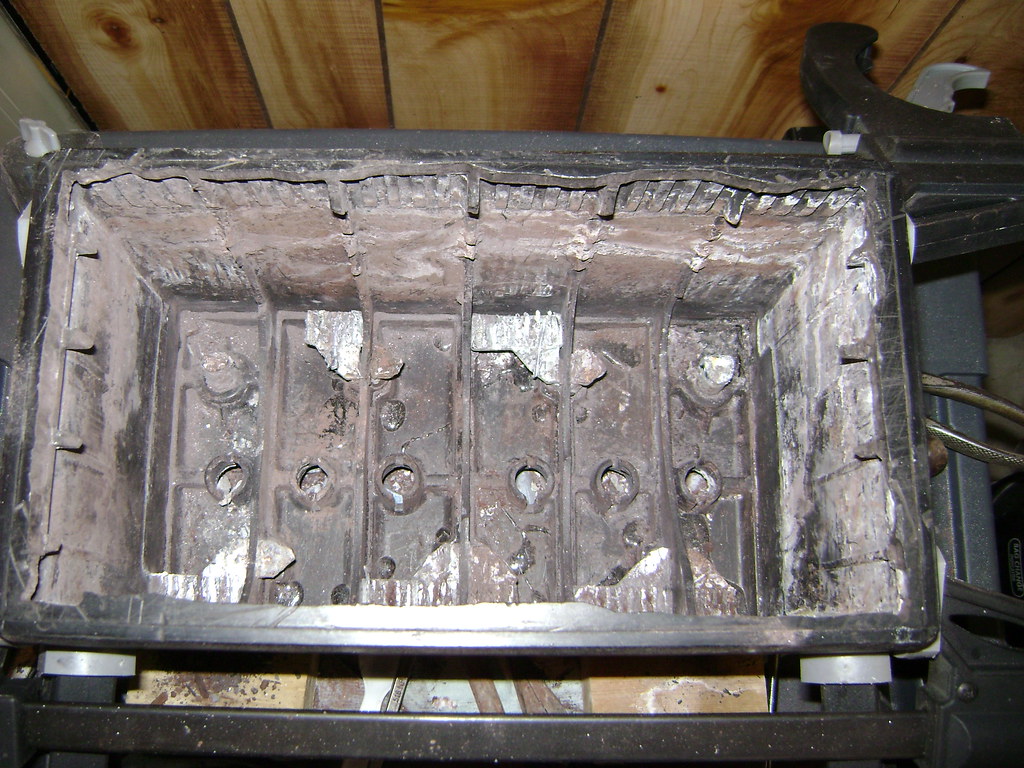 The good news...an inspection of the exterior of the case, sides and top, showed no more damage than what we had already seen. The crack around the positive post on the top of the battery has not changed since I removed the battery from the car. With some repairs, I think the case is entirely salvageable. |
|
DynoDave
CO-ADMINISTRATOR
Motown Mopar-Wizard
Posts: 11,157
|
Post by DynoDave on Apr 25, 2020 15:31:40 GMT -5
Well, the NFL draft is close enough to over for me to get back to work! Cleaned up the mess I made gutting the battery, and cleaned and oiled the tools. I'll start in on cleaning the case later tonight. Was going to call it a morning, then started looking at the mess the engine compartment is. Where to start? EVERYTHING needs cleaning, replacing, work work work. I thought if I was going to start to work in here, then cleaning up around where the radiator mounts would be the place, before the radiator is re-installed. There were quite a few bent over fins on the condenser (I think the radiator has been in and out once before), so straightening that out and cleaning that area was the thing to do, it seemed. A few "before" photos of the damaged areas.   The magic radiator comb!  Some of those areas are too bent up for the comb to get through, so I did a little pre-work in spots with a small screwdriver.   Those same two spots "after". Worked pretty darned good, I must say.   After working my way the rest of the way across, blowing it out with compressed air, then brushing it off, it turned out pretty nice. Not bad for 43 years old.  Now I'll have to do the front side too. |
|
|
|
Post by brigond on Apr 25, 2020 18:08:24 GMT -5
Wow! Remind me not to gut battery .
That was alot of work.
Glad to see you conquered it.
The finn's look much better too.
|
|